Learn how to use the WordPress admin dashboard area with this handy guide, including detailed instructions and tips.
Table of Contents
The WordPress admin area, often referred to as the WordPress Dashboard, is the central hub where all aspects of your website are controlled and managed. Whether you’re a beginner or an experienced website owner, mastering the admin area is crucial for the successful management of your site. Learning How to Use the WordPress Admin Dashboard is simple and this guide will provide you with in-depth instructions and explanations to help you navigate and make the most of the WordPress admin area, covering everything from logging in to customising your site’s appearance and settings.
Getting Started: How to Use the WordPress Admin Dashboard
Before you can begin managing your site, you’ll need to access the WordPress admin area. This section covers the essentials of logging in and familiarises you with the main dashboard interface.
Logging into the WordPress Admin Area
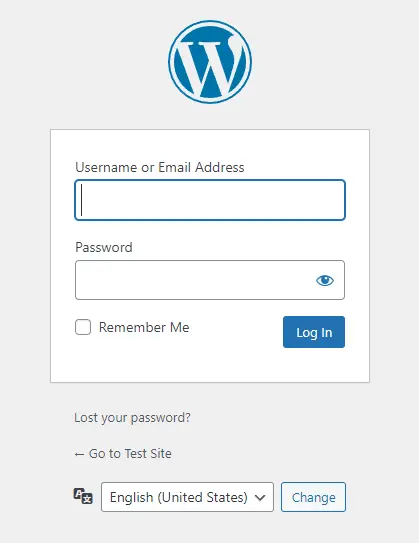
The first step in managing your WordPress site is to log in to the admin area. This is where all the content creation, customisation, and management take place.
- Navigate to the Login Page: To access the login page, simply append
/wp-adminor/wp-login.phpto the end of your website’s URL (for example,www.yoursite.com/wp-admin). This will direct you to the login screen where you can enter your credentials. - Enter Your Credentials: On the login screen, input the username and password that you set during the WordPress installation process. If you’ve forgotten your password, WordPress provides a simple ‘Lost your password?’ link that allows you to reset it via email.
- Click ‘Log In’: After entering your details, click the ‘Log In’ button to gain access to your WordPress admin area. If your details are correct, you’ll be taken directly to the dashboard, the main control panel of your site.
The login page is the gateway to your site’s backend, so it’s essential to keep your login credentials secure and enable additional security measures like two-factor authentication if possible.
Overview of the WordPress Dashboard
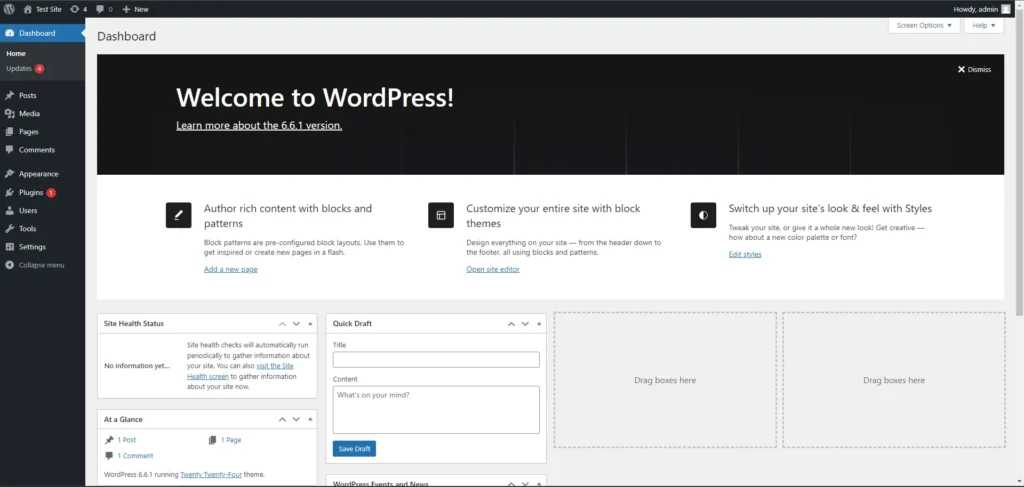
Upon logging in, you’ll arrive at the WordPress Dashboard. This is the central hub from which you can access and manage every aspect of your site. At first glance, the dashboard might seem overwhelming due to the various menus and options available. However, understanding its layout and functionality will make site management much easier.
Main Sections of the Dashboard:
- Welcome Panel: The Welcome Panel is designed to help you get started with common tasks. It includes links to write your first blog post, view your site, or manage widgets and menus. If you’re new to WordPress, this panel can be particularly useful.
- At a Glance: This section gives you a quick overview of your site, displaying the number of posts, pages, and comments. It also shows your current WordPress version and theme, helping you keep track of essential information.
- Activity: The Activity section displays recent activity on your site, including the latest posts and comments. You can also quickly approve, reply to, or delete comments directly from this section.
- Quick Draft: The Quick Draft widget allows you to quickly jot down ideas for new posts or pages. It’s a handy tool for capturing ideas on the fly, but remember that these drafts are just that—drafts. You’ll need to edit and publish them later.
- WordPress News: This widget keeps you informed about the latest news and updates from the WordPress community, including new releases, security alerts, and tips for site management.
The Dashboard is fully customisable, allowing you to drag and drop these sections to organise the layout according to your preferences. You can also hide sections you don’t need by using the ‘Screen Options’ tab at the top right corner of the screen.
Navigating the WordPress Admin Menu
On the left-hand side of the dashboard, you’ll find the WordPress Admin Menu. This vertical menu is where you can access all the main features of your site, such as posts, pages, media, and settings. Understanding the function of each menu item is essential for efficiently managing your site.
Key Menu Items:
- Dashboard: Clicking on ‘Dashboard’ will return you to the main dashboard screen. This is useful if you’ve navigated to other parts of the admin area and need to return to the home base.
- Posts: The ‘Posts’ menu is where you’ll manage all your blog content. You can add new posts, edit existing ones, and organise your posts with categories and tags. This section is the heart of your blog if you run one.
- Media: The ‘Media’ menu is where you’ll manage your media library. Here, you can upload images, videos, audio files, and other media, as well as organise them and add them to your posts or pages.
- Pages: Similar to posts, the ‘Pages’ menu is where you create and manage static pages on your site, such as the homepage, about page, and contact page. Unlike posts, pages are typically used for timeless content.
- Comments: The ‘Comments’ section allows you to manage comments on your posts. You can approve, delete, or reply to comments, and even mark them as spam. This is an essential tool for maintaining your site’s community and interactions.
- Appearance: The ‘Appearance’ menu is where you can customise the look and feel of your site. This includes selecting and customising themes, managing widgets, creating and arranging menus, and more.
- Plugins: Plugins add functionality to your WordPress site without requiring you to code. The ‘Plugins’ menu allows you to manage installed plugins, add new ones, or deactivate/delete existing ones.
- Users: The ‘Users’ menu is where you manage all the user accounts on your site. You can add new users, edit profiles, change passwords, and assign user roles.
- Tools: The ‘Tools’ menu contains useful utilities for managing your site, such as importing and exporting data, checking site health, and troubleshooting.
- Settings: The ‘Settings’ menu allows you to control various site-wide settings, including general settings like the site title and tagline, as well as more advanced options such as permalinks and reading settings.
Navigating the admin menu is straightforward, but the sheer number of options can be intimidating at first. Take your time exploring each menu item to become familiar with its functions. With regular use, you’ll quickly learn how to access the tools you need.

Creating and Managing Content
Creating and managing content is one of the core functions of WordPress. Whether you’re writing blog posts, publishing pages, or uploading media, the WordPress admin area provides a user-friendly interface for all your content needs.
Creating a New Post
Posts are the primary way of publishing content in WordPress, particularly if you’re running a blog. Each post can be categorised, tagged, and published in chronological order, making it ideal for news, updates, or regular blog entries.
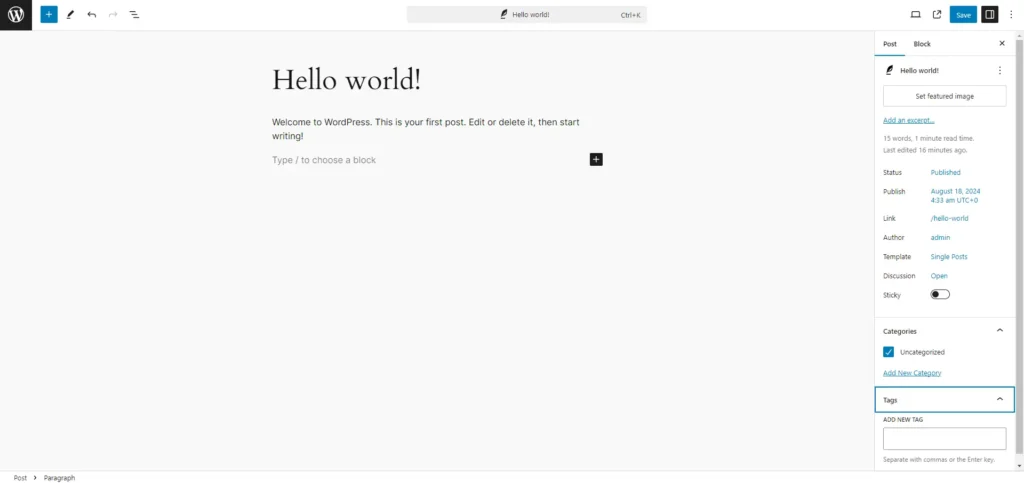
- Go to Posts > Add New: To create a new post, navigate to the ‘Posts’ menu and click on ‘Add New.’ This will open the post editor where you can begin creating your content.
- Enter a Title: The title of your post is crucial as it sets the tone and gives readers a preview of what to expect. Make sure your title is engaging and relevant to the content.
- Add Content: Below the title, you’ll find the main content area. Here, you can write your post using the WordPress editor, which supports both classic and block-based content creation. You can format your text, add headings, insert images, and embed media directly into the post.
- Add Categories and Tags: On the right side of the editor, you’ll see options to assign categories and tags to your post. Categories help organise your posts into broad groups, while tags are used to label your posts with specific topics or keywords. This categorisation improves site navigation and SEO.
- Publish: Once you’re satisfied with your content, click the ‘Publish’ button on the right-hand side to make your post live. You can also schedule posts to be published at a future date or save them as drafts if you’re not ready to publish immediately.
Posts are dynamic pieces of content, and WordPress makes it easy to update or edit them at any time. Regularly reviewing and refreshing old posts can also help maintain the relevance and accuracy of your blog.
Creating a New Page
Pages in WordPress are used for static content that doesn’t change frequently, such as an About Us page, Contact page, or Homepage. Unlike posts, pages are not organised by date and don’t typically include categories or tags.
- Go to Pages > Add New: To create a new page, navigate to the ‘Pages’ menu and click on ‘Add New.’ This opens a page editor similar to the post editor, but with a few differences geared towards static content.
- Enter a Title and Content: As with posts, you’ll need to enter a title and content for your page. The content area allows you to add text, images, and other media using the WordPress editor. Pages often contain essential information about your site or business, so ensure the content is clear and well-structured.
- Page Attributes: In the ‘Page Attributes’ section on the right, you can organise pages by setting parent pages, which creates a hierarchy, and choosing page templates, which may vary depending on your theme. Some themes offer custom page templates for specific types of pages, such as full-width layouts or landing pages.
- Publish the Page: When you’re ready, click the ‘Publish’ button to make the page live. As with posts, you can also save pages as drafts or schedule them for future publication.
Pages are central to your website’s structure, serving as the foundation for navigation and user experience. Regularly reviewing your pages to ensure they are up-to-date and accurately reflect your site’s purpose is important for maintaining a professional online presence.
Managing Media
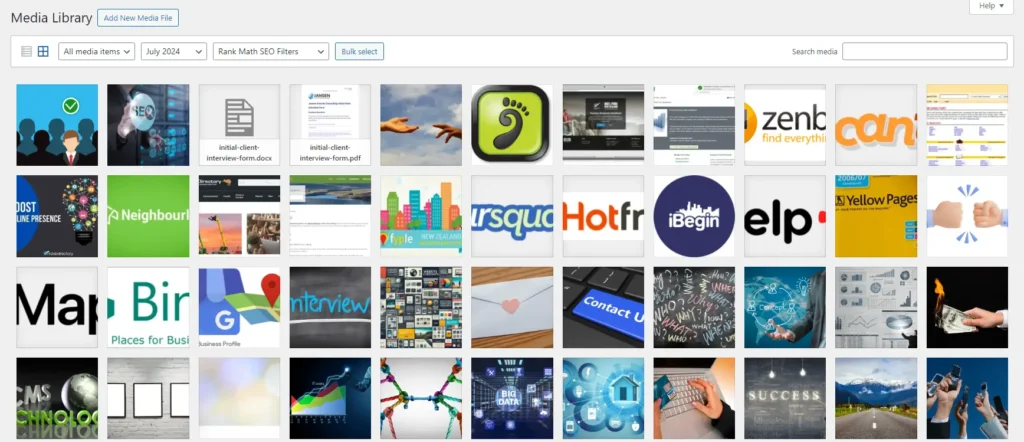
The Media Library in WordPress is where all your uploaded files, including images, videos, and documents, are stored. Managing your media effectively ensures that your site’s content is visually appealing and organised.
- Go to Media > Library: This is where you can view and manage all the media files uploaded to your site. The Media Library provides two main views: grid and list. The grid view displays thumbnails of your media, while the list view shows more detailed information about each file.
- Upload New Media: To upload new files, click on ‘Add New’ and either drag files from your computer into the upload area or select them manually. WordPress supports a wide range of file types, including JPEG, PNG, GIF, MP4, and PDF.
- Edit Media: Each media file can be edited by clicking on it within the Media Library. You can change the file’s title, add a caption, alt text, and a description. Alt text is particularly important for SEO and accessibility, as it helps search engines understand what an image is about and provides context for users with visual impairments.
- Inserting Media into Posts and Pages: You can easily insert media into posts and pages by clicking the ‘Add Media’ button in the editor. This opens the Media Library where you can select an existing file or upload a new one. Once inserted, you can align the media within your content and add captions if needed.
Managing your media effectively not only enhances the visual appeal of your content but also helps with SEO and site performance. Regularly cleaning up unused or outdated files from your Media Library can keep your site’s backend tidy and organised.
Customising Your WordPress Site
One of the strengths of WordPress is its flexibility in allowing you to customise the appearance and functionality of your site. Whether through themes, widgets, or menus, you have full control over how your site looks and operates.
Choosing and Installing a Theme
Themes in WordPress dictate the overall look and feel of your site. They control everything from layout and colours to typography and widget placement.
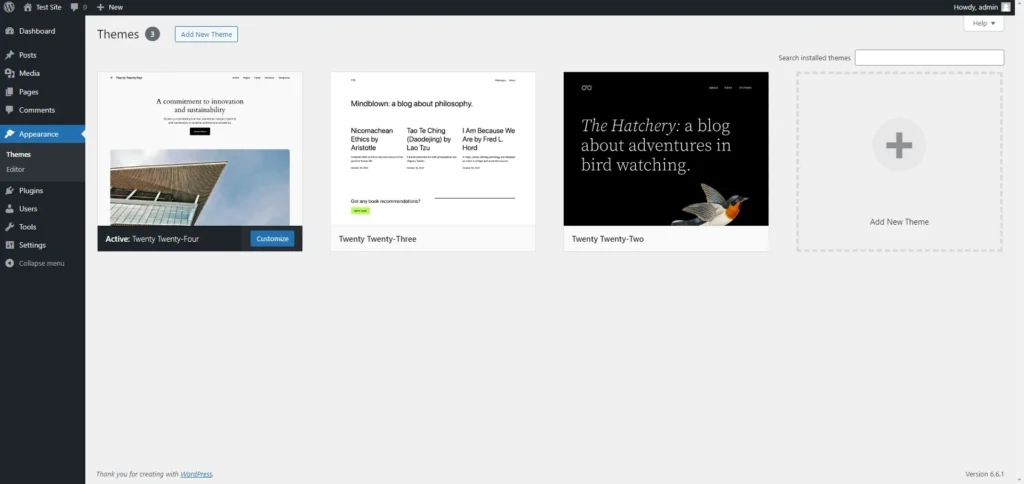
- Go to Appearance > Themes: This screen displays all the themes currently installed on your site. You’ll see your active theme at the top, along with any other themes you have installed but aren’t using.
- Add New Theme: To explore new themes, click ‘Add New.’ This will take you to the WordPress theme repository, where you can browse thousands of free themes. You can filter themes by layout, subject, or specific features such as being mobile-friendly.
- Preview and Activate: When you find a theme you like, you can preview how it will look on your site by clicking ‘Preview.’ If you’re happy with the look, click ‘Activate’ to apply the theme to your site.
- Customise Your Theme: Once a theme is activated, you can often customise it through the WordPress Customizer or a dedicated theme options panel, depending on the theme’s features.
Themes play a crucial role in how your site is perceived by visitors. Choose a theme that aligns with your site’s purpose and audience, and consider investing in a premium theme if you require advanced features or a more polished design.
Customising Your Theme
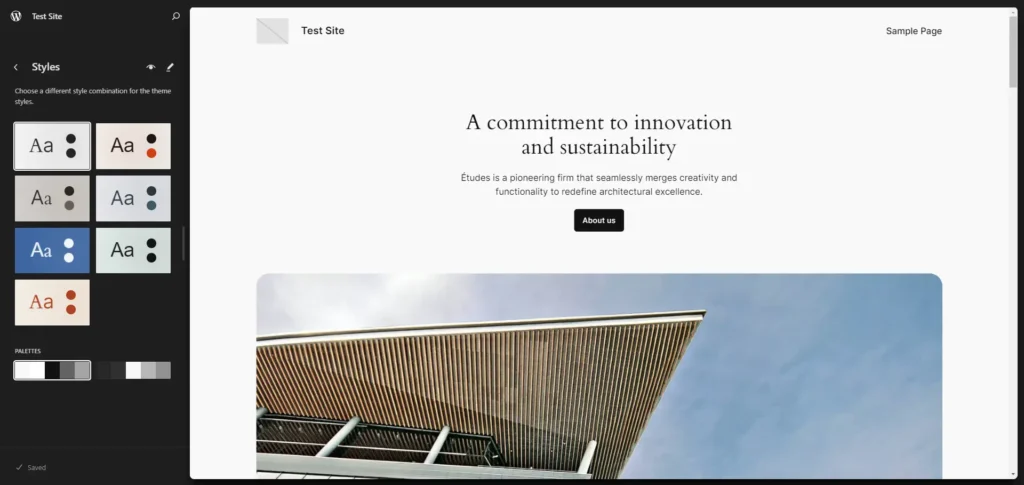
After activating a theme, you’ll likely want to make some customisations to ensure it fits your brand or style. WordPress offers several tools for customising your theme without needing to touch any code.
- Go to Appearance > Customise: This opens the WordPress Customiser, a powerful tool that lets you make changes to your site’s appearance in real-time. The Customiser allows you to adjust your site’s colours, fonts, background images, and more, depending on your theme’s capabilities.
- Customise Options: The Customiser is divided into sections, each corresponding to a different part of your site. Common sections include ‘Site Identity’ (where you can change your site title and tagline), ‘Colours,’ ‘Menus,’ ‘Widgets,’ and ‘Homepage Settings.’
- Live Preview: As you make changes in the Customiser, you’ll see them reflected instantly in the preview pane. This live preview feature allows you to experiment with different looks and settings without committing to any changes until you’re satisfied.
- Publish Changes: Once you’re happy with your customisations, click ‘Publish’ to save and apply them to your site. If you’re not ready to go live with your changes, you can also save them as a draft or schedule them to be published at a later date.
Customising your theme allows you to create a unique look for your site that reflects your brand and content. It’s worth spending some time exploring all the options your theme offers to make the most of its design capabilities.
Adding and Managing Widgets
Widgets are small content blocks that you can place in various widget-ready areas of your site, such as the sidebar or footer. They add functionality and features to your site without requiring any coding.
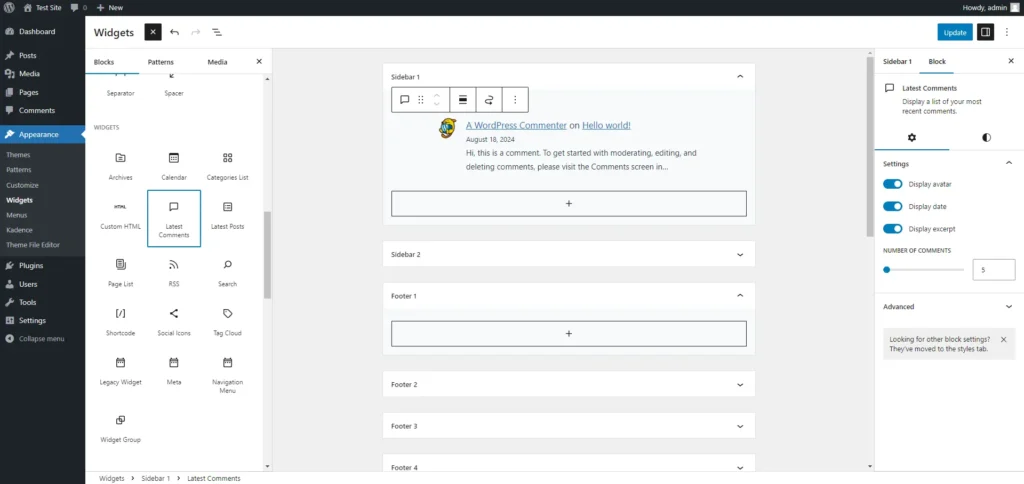
- Go to Appearance > Widgets: This page displays all available widgets on your site, as well as the widget areas provided by your theme. Common widget areas include the sidebar, footer, and header.
- Adding a Widget: To add a widget, simply drag it from the list of available widgets on the left to your desired widget area on the right. For example, you might drag the ‘Search’ widget to the sidebar or the ‘Recent Posts’ widget to the footer.
- Configuring the Widget: After placing a widget in a widget area, you can configure its settings. Each widget has different options depending on its function. For example, the ‘Text’ widget allows you to add custom text or HTML, while the ‘Recent Posts’ widget lets you set the number of posts to display.
- Removing or Reordering Widgets: To remove a widget, drag it back to the available widgets area or click ‘Delete.’ You can also reorder widgets within a widget area by dragging and dropping them.
Widgets are an excellent way to enhance your site’s usability and provide additional information or features to your visitors. Experiment with different widgets to see how they can improve your site’s layout and functionality.
Creating and Managing Menus
Menus are a crucial part of your site’s navigation. They help visitors find the content they’re looking for and improve the overall user experience.
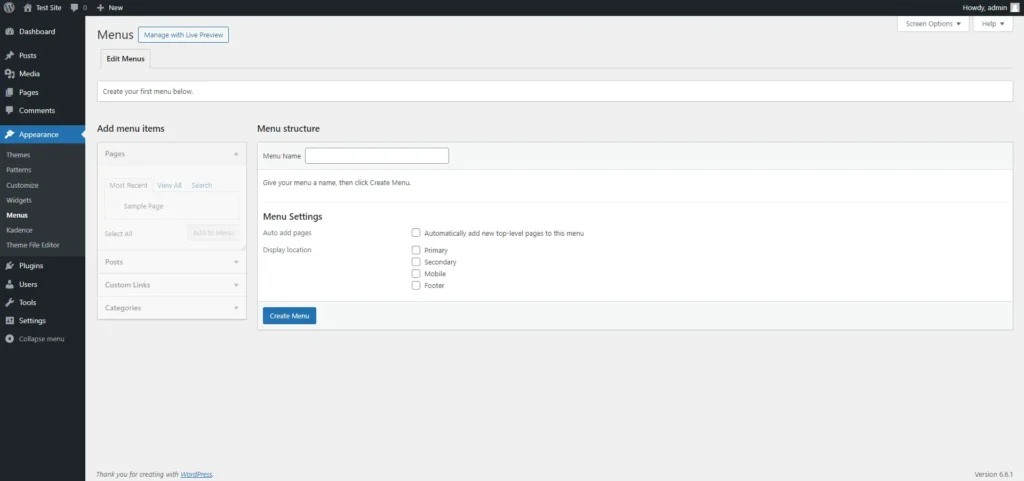
- Go to Appearance > Menus: The Menus page allows you to create and manage your site’s navigation menus. You can create multiple menus for different locations on your site, such as the header, footer, or sidebar.
- Create a New Menu: To start, click ‘Create a new menu’ and give your menu a name. This name is for your reference and won’t be visible to visitors.
- Adding Items to the Menu: On the left side of the Menus page, you’ll see options to add pages, posts, categories, or custom links to your menu. Simply check the boxes next to the items you want to add and click ‘Add to Menu.’
- Organising Menu Items: Once your items are in the menu, you can drag and drop them to rearrange their order. You can also create submenus by dragging an item slightly to the right beneath another item. Submenus are typically used for dropdown menus.
- Assign the Menu to a Location: Depending on your theme, you can assign your menu to different locations, such as the primary navigation bar or the footer. Most themes support multiple menus, allowing you to create distinct navigation paths for different parts of your site.
- Save Menu: After organising your menu, click ‘Save Menu’ to apply it to your site.
Effective menus are vital for good website navigation. Ensure that your menus are well-organised and easy to use, making it simple for visitors to find the content they’re looking for.
Managing Plugins
Plugins are one of the key features that make WordPress so powerful. They allow you to add almost any functionality you can imagine, from SEO tools and contact forms to security features and social media integration. Just remember to choose your plugins carefully, too many plugins will slow your website down!
Installing a Plugin
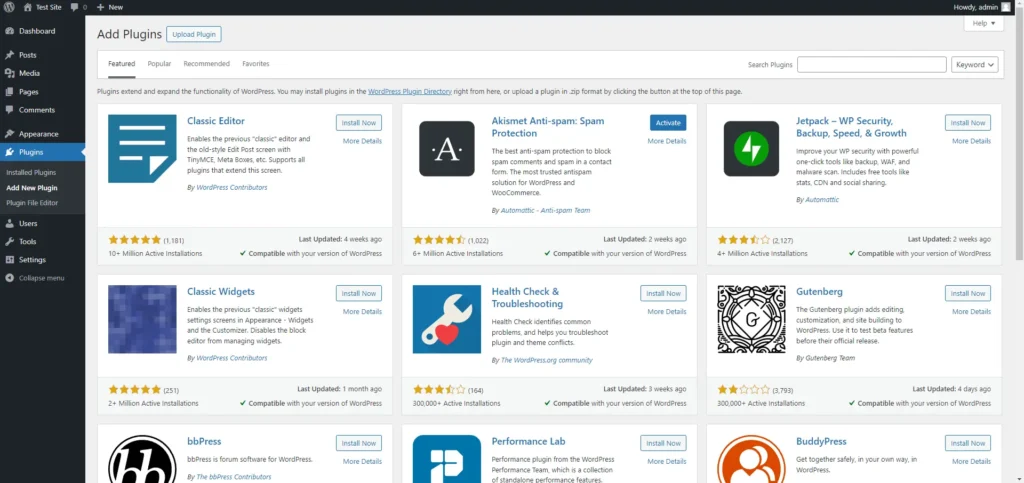
- Go to Plugins > Add New: To install a new plugin, navigate to the ‘Plugins’ menu and click on ‘Add New.’ This takes you to the plugin repository, where you can search for and install plugins directly from your WordPress dashboard.
- Search for a Plugin: Use the search bar to find a specific plugin by name or browse through the featured, popular, or recommended plugins. Each plugin listing includes a brief description, user reviews, and compatibility information.
- Install and Activate: Once you find a plugin that suits your needs, click ‘Install Now.’ After installation, the button will change to ‘Activate.’ Click ‘Activate’ to enable the plugin on your site.
- Plugin Settings: After activating a plugin, you may need to configure its settings. Most plugins add a new menu item to your admin menu or place their settings under ‘Settings’ or ‘Tools.’
Installing plugins is a straightforward process, but it’s important to choose plugins carefully. Always check the plugin’s ratings, reviews, and compatibility with your WordPress version to avoid conflicts or performance issues.
Managing Installed Plugins
Once you’ve installed a few plugins, it’s essential to manage them properly to ensure your site runs smoothly.
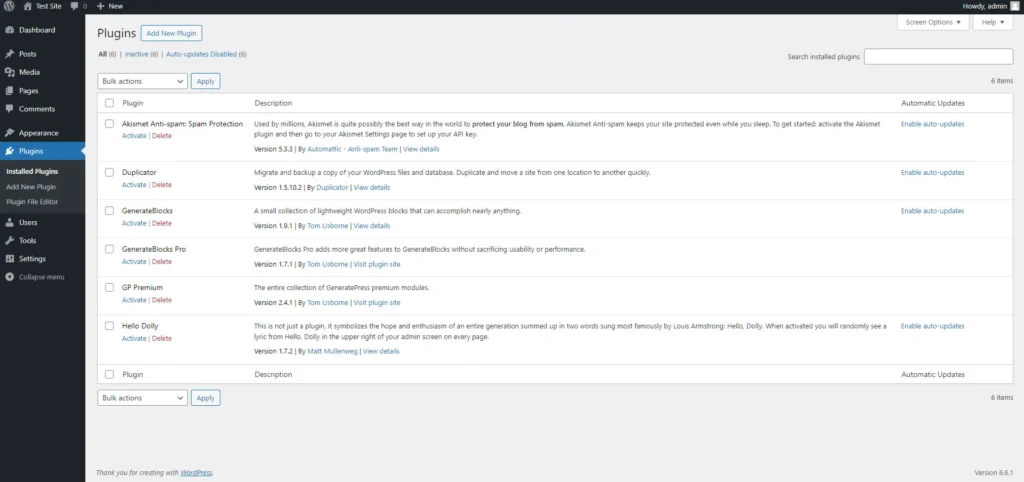
- Go to Plugins > Installed Plugins: This page lists all the plugins currently installed on your site, both active and inactive.
- Activate/Deactivate Plugins: Use the links under each plugin’s name to activate or deactivate it. Deactivating a plugin turns off its functionality without removing it from your site, which can be useful for troubleshooting or temporarily disabling features.
- Update Plugins: WordPress regularly notifies you when updates are available for your plugins. Keeping plugins up-to-date is crucial for security and compatibility. Click ‘Update Now’ under a plugin to install the latest version.
- Delete Plugins: If you no longer need a plugin, deactivate it first, then click ‘Delete’ to remove it from your site. Keeping your plugin list lean and relevant helps maintain site performance and security.
Plugins are powerful tools that can significantly enhance your site’s capabilities, but they also require regular management. Regularly review your plugins to ensure they’re still needed and functioning correctly.
Managing Users
If you have multiple people managing your WordPress site, you’ll need to understand how to manage user accounts and roles. WordPress allows you to create different roles with specific permissions, helping you control who can do what on your site.
Adding a New User
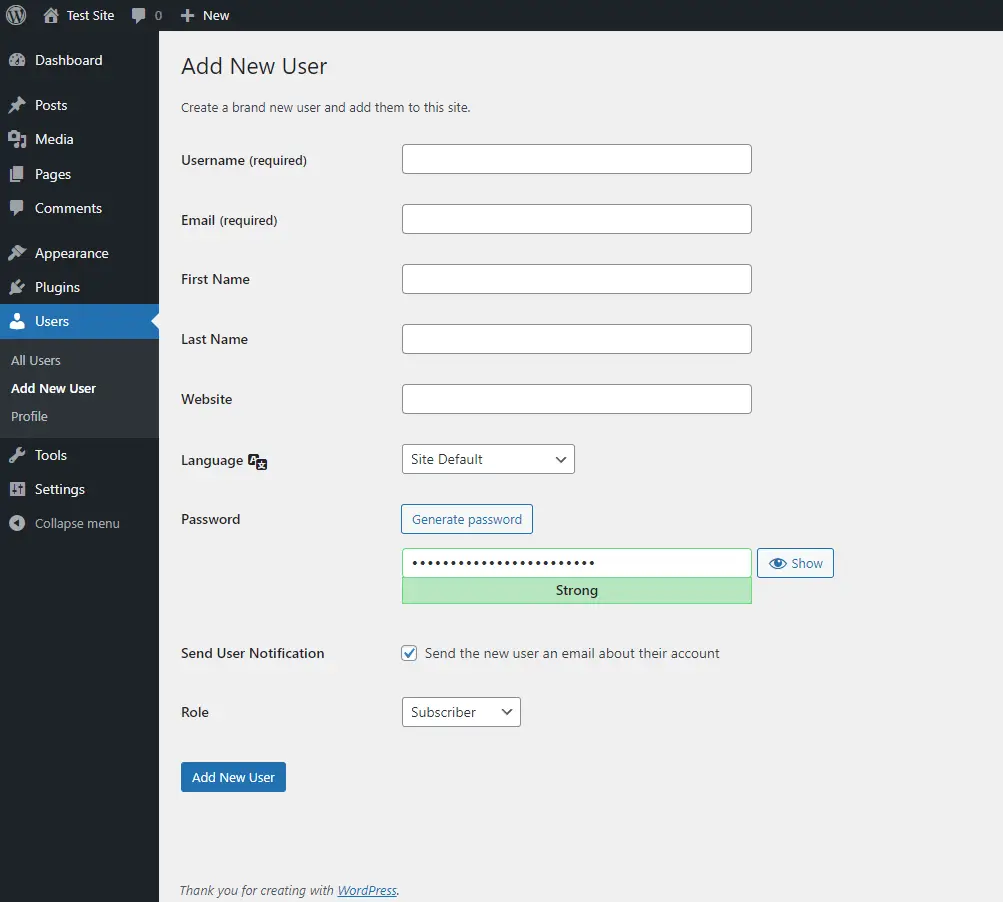
- Go to Users > Add New: To create a new user account, navigate to the ‘Users’ menu and click on ‘Add New.’ This opens a form where you can input the new user’s details.
- Enter User Information: Fill in the required fields, including username, email, first and last name, and password. The username and email are mandatory, and the email address will be used for notifications and password recovery.
- Assign a Role: WordPress offers several user roles, each with different permissions:
- Administrator: Full access to all site features.
- Editor: Can manage and publish posts, including those of other users.
- Author: Can write, edit, and publish their own posts.
- Contributor: Can write and edit their own posts but cannot publish them.
- Subscriber: Can only manage their own profile.
- Send User Notification: You can choose to send the new user an email with their login details by checking the appropriate box.
- Add New User: Click the ‘Add New User’ button to create the account. The new user can then log in and perform actions according to the role you’ve assigned them.
Managing users is essential for maintaining control over your site, especially if multiple people are involved in content creation or site management. Always assign roles based on the specific needs and trust level of each user.
Editing User Profiles
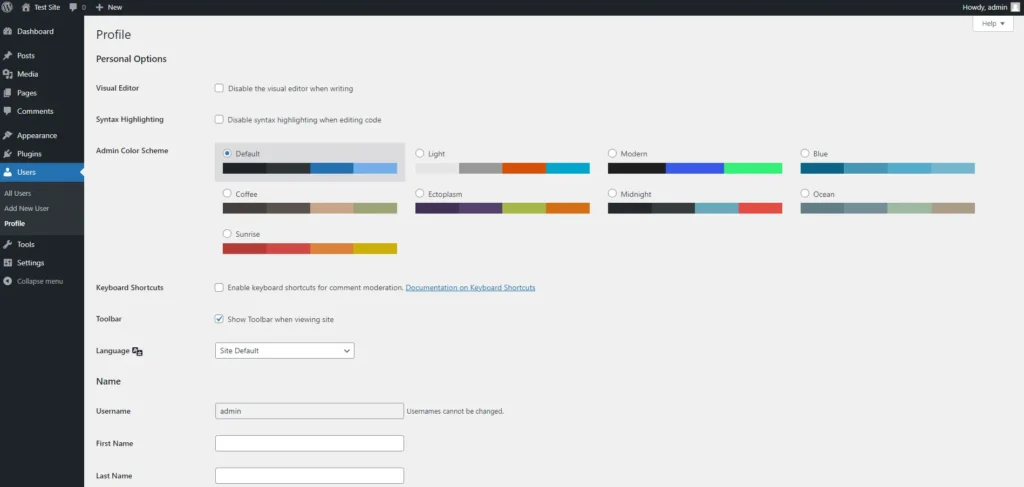
Each user on your WordPress site has a profile that can be customised. As an administrator, you can edit any user’s profile, while other users can typically only edit their own.
- Go to Users > All Users: This page lists all the users registered on your site. You can filter users by role or search for a specific user.
- Edit a User: Click on the username of the person you want to edit. This opens their profile where you can make changes.
- Update User Information: You can change various details, including the user’s display name, contact information, biographical info, and profile picture (via Gravatar). You can also reset passwords from this screen.
- Change User Role: If necessary, you can change the user’s role from this screen. Be cautious when assigning higher-level roles, as they come with increased permissions.
- Save Changes: Click ‘Update User’ to save any changes you’ve made.
User management is a critical part of maintaining the security and efficiency of your WordPress site. Regularly review user roles and permissions to ensure that only trusted individuals have access to sensitive areas of your site.
Configuring WordPress Settings
The Settings menu in WordPress is where you’ll configure the general aspects of your site, as well as more specific settings related to reading, writing, discussion, and more. Properly configuring these settings ensures that your site operates smoothly and behaves as expected.
General Settings
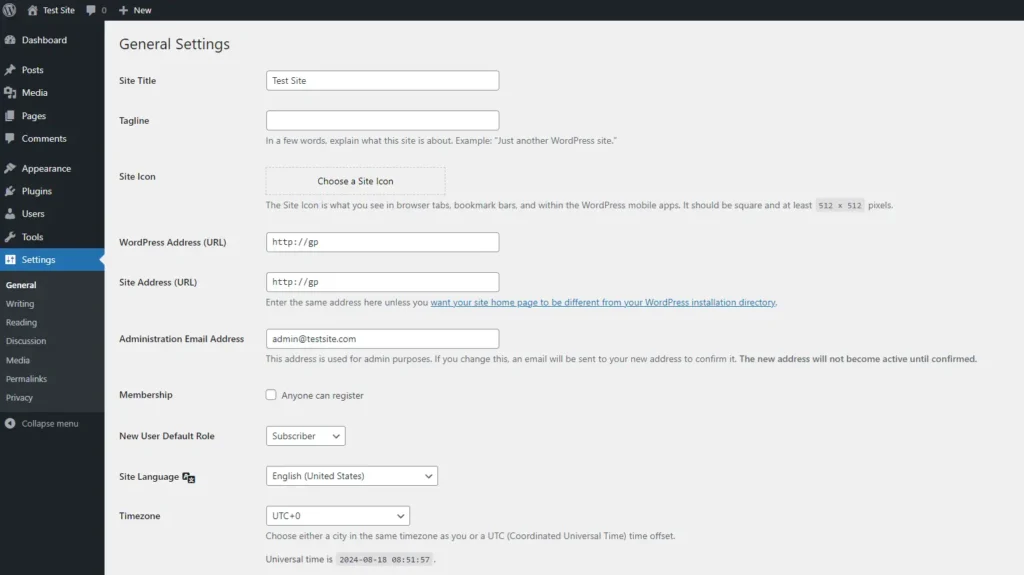
The General Settings page is where you’ll set the basic information for your site, such as its name, tagline, and email address.
- Go to Settings > General: This page includes fields for your site’s title, tagline, WordPress address (URL), site address (URL), and administration email address. These details are crucial as they define your site’s identity and how it’s perceived by visitors and search engines.
- Site Title and Tagline: The site title is the name of your site, while the tagline is a short phrase that describes what your site is about. Both appear in the browser tab and may be used by search engines, so make sure they’re relevant and descriptive.
- Email Address: The administration email address is where WordPress sends notifications, including updates, password resets, and user registration details. Ensure this is an address you check regularly.
- Membership and New User Default Role: If you want to allow visitors to register as users on your site, check the ‘Anyone can register’ box. You can also set the default role for new users (e.g., Subscriber, Contributor).
- Timezone, Date Format, and Time Format: Set your site’s timezone, date format, and time format according to your preferences. This is important for scheduling posts and displaying accurate times on your site.
- Save Changes: After making adjustments, click ‘Save Changes’ to apply them.
The General Settings page is the backbone of your site’s configuration. It’s important to review these settings when you first set up your site and revisit them periodically to ensure they’re still accurate.
Reading Settings
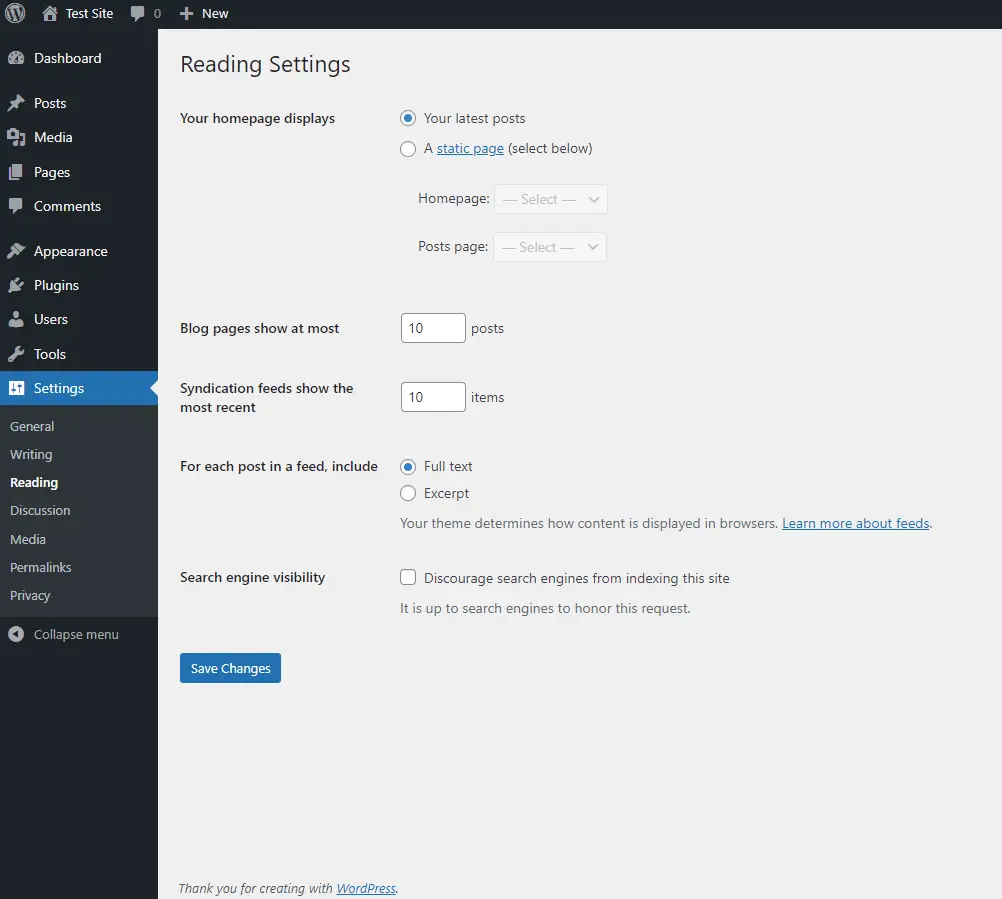
The Reading Settings page controls how your site’s content is displayed to visitors, including what appears on your homepage and how many posts are shown in archives.
- Go to Settings > Reading: This page allows you to choose what your site’s homepage displays: either your latest posts (a blog) or a static page. Many business websites prefer a static homepage with a blog section elsewhere on the site.
- Set Your Homepage and Posts Page: If you select a static page for your homepage, you’ll also need to designate another page to display your blog posts. This could be a page titled ‘Blog’ or ‘News,’ for example.
- Blog Pages Show at Most: Here, you can set how many posts are displayed per page on your blog archive pages. The default is typically ten posts per page.
- Syndication Feeds Show the Most Recent: This setting controls how many items are included in your site’s RSS feed. If you regularly publish content, you might want to limit this to avoid overwhelming subscribers.
- For Each Article in a Feed, Show: Choose whether to show the full text of each post or just a summary in your RSS feed. Showing a summary can encourage visitors to click through to your site to read the full post.
- Search Engine Visibility: If your site is not yet ready to go public, you can discourage search engines from indexing it by checking the ‘Discourage search engines from indexing this site’ box. Be sure to uncheck this once your site is live.
- Save Changes: Don’t forget to save your changes after adjusting these settings.
The Reading Settings page is essential for controlling how your content is presented to visitors. Adjust these settings to create the best experience for your audience.
Discussion Settings
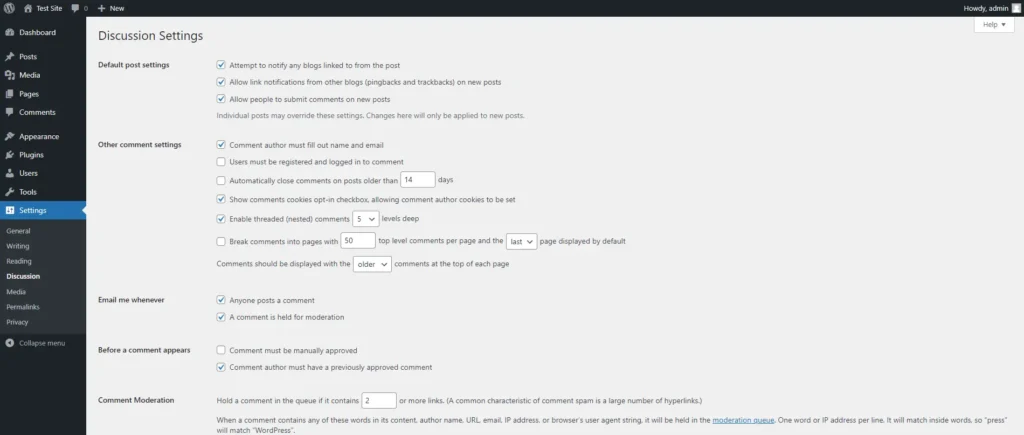
The Discussion Settings page controls how comments are managed on your site. This is particularly important if you allow user comments on your posts or pages.
- Go to Settings > Discussion: This page includes various options for managing comments, including whether they’re allowed by default, how they’re moderated, and how you’re notified of new comments.
- Default Article Settings: These settings control the default behaviour of comments on new posts. You can allow people to post comments on new articles, allow link notifications (pingbacks and trackbacks), and notify other blogs when you link to them.
- Other Comment Settings: Here, you can require users to fill in their name and email to comment, close comments on older articles automatically, and enable nested comments (replies to comments).
- Email Me Whenever: This option notifies you when anyone posts a comment or when a comment is held for moderation. Moderation is important for preventing spam and ensuring that comments contribute positively to your site.
- Before a Comment Appears: You can choose to manually approve every comment before it appears on your site, or you can allow comments from previously approved users to be published automatically.
- Comment Moderation and Blacklist: These sections allow you to set up rules for holding comments for moderation or marking them as spam. For example, you might hold comments containing a certain number of links, which is often a sign of spam.
- Save Changes: After configuring your comment settings, make sure to save the changes.
Managing comments effectively is key to maintaining a positive and engaged community on your site. Regularly review your discussion settings to ensure they align with your site’s goals.
Frequently Asked Questions
What is the WordPress admin area?
The WordPress admin area, also known as the dashboard, is the control centre for your website. It’s where you manage content, customise your site’s appearance, install plugins, and configure settings.
How do I access the WordPress admin area?
You can access the WordPress admin area by adding /wp-admin or /wp-login.php to the end of your website URL (e.g., www.yoursite.com/wp-admin). Enter your username and password to log in.
What are WordPress plugins?
Plugins are add-ons that extend the functionality of your WordPress site. They can add new features, enhance security, improve SEO, and much more.
Can I change the appearance of my WordPress site?
Yes, you can change the appearance of your WordPress site by selecting and customising a theme. This can be done through the ‘Appearance’ menu in the admin area.
How do I add a new user to my WordPress site?
You can add a new user by going to ‘Users > Add New’ in the admin menu, filling in the required details, and assigning a role.
What should I do if I can’t log into my WordPress admin area?
If you’re unable to log into your WordPress admin area, try resetting your password using the ‘Lost your password?’ link on the login page. If that doesn’t work, you may need to check with your hosting provider for further assistance.
Conclusion
Hopefully this gives you a good understanding on how to use the WordPress admin dashboard. Getting comfortable with the WordPress admin area is crucial for effectively managing your website. Whether you’re creating content, customising your site’s appearance, or managing plugins and users, understanding how to navigate and use the admin area will help you to make the most of your WordPress site.
If you need more help or have any questions feel free to drop me a line. I would love to help you out!


